Work on the south side of the house is wrapping up; now the focus is on the northwest corner which has long been marred by a hideous 1970’s carport. Both the carport and the concrete slab poured beneath it have contributed to water damage and other forms of deterioration. Eventually the carport will be removed, but for now it provides handy scaffolding for work in this area and shade/protection for projects beneath it.
While scraping paint beneath the metal shingles of the gable, Jim made a fun discovery…
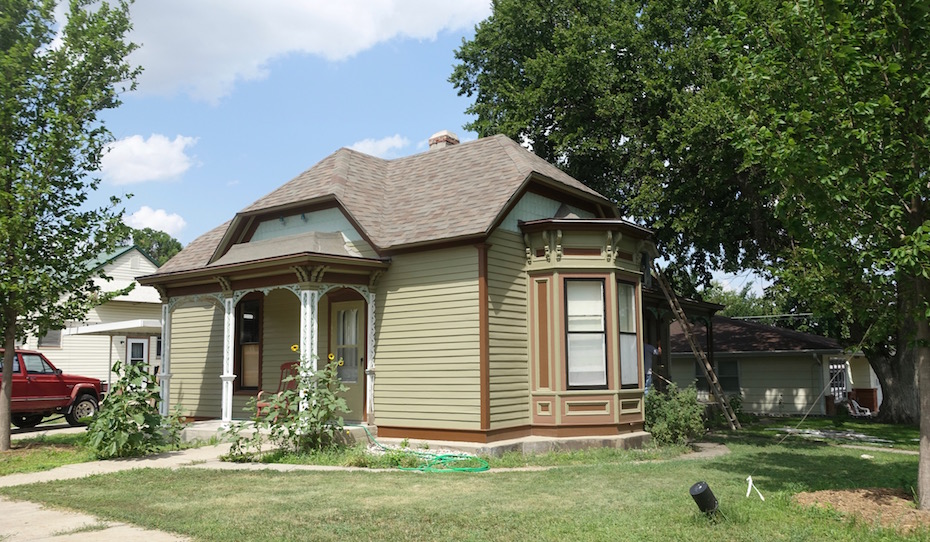
This is the northwest corner; the north wall has been relieved of its vinyl shroud while the west wall is still encapsulated.
Decades of water infiltration festered beneath the vinyl. Fortunately, we don’t get tons of rain out here; it could have been much worse.
Jim re-created the missing drip edge of the water table and is patching deteriorated siding. Flimsy styrofoam “insulation” still clings to the west wall.
Higher up on the wall were similar problems. Window pediments here, as elsewhere on the house, have lost their return moldings.
This is the fun part! Look closely at the clapboard just beneath the blue metal shingles. Do you see the triangular shapes? Clearly there had once been some type of zigzag ornament below the shingles!
I was reminded of this image of the house — the earliest we have — which does, in fact, show a zigzag motif in the south gable end! Initially I dismissed this as artistic license as the porch shown does not reflect the true porch which survives to this day. The illustration also suggests a two-tiered paint scheme in the gable but we have found no physical evidence of that. The drawing appears to be a mix of fact and fiction.
What should be done about this new discovery?! Jim came up with the answer. Using aluminum which had previously been removed from the eave moldings, he created over 90 new triangular shapes based on the “ghosts” found on the north gable.
Horrible 1980’s aluminum which had previously entombed beautiful wood moldings is transformed into the missing triangular shingle details. Here, Jim marks the aluminum prior to cutting.
He then built a jig to shape the triangles and give them a bit of depth to mimic the original metal shingles in the gable ends. Each triangle was inserted into the jig; a metal chalk line was used as a block to help form the triangles. When struck with a hammer, the “block” gave subtle depth to each piece. Soon they will be primed, painted and installed!
The west front slowly cleans up. The storm windows are now painted black, but I will probably put off doing the window sash behind them until next summer.
Finally I get to pull aluminum and vinyl off of the south dormers! Some of Jim’s triangles were cut from the piece I’m removing.
Curious joinery was revealed beneath the aluminum. The vinyl vandals chopped off the ends of each cap above the windows. Jim patched these areas prior to priming.
Sensing that I was having too much fun, Jim joined me in liberating the other dormer!
Vinyl and aluminum littered the yard until loaded into the truck for recycling or disposal.
Jim repaired the window sills with epoxy prior to priming the dormers. Getting rid of the powder blue made a huge difference!
The final product! Two porch pilasters remain to be restored and painted. Also, the porch brackets need to be repainted; new information shows the seafoam color to have been more subtle. In looking at this photo, I am reminded of how much I dislike that small concrete table — an artifact from the previous owner. It’s been useful, but needs to go. The porch swing, in place for over a century, will be restored.
A closer look…
Back at home, iron roof cresting gets painted in the yard. Hopefully installation can take place this fall!
Newly restored returns on each window/door header on the south porch! No one would ever guess that these had once all been lopped off.
I’ve started painting the “vines” inside each porch support. I will then cut in with brown on the supports themselves. It’s more tedious than even I had suspected, but will be well worth the effort when completed! The ugly storm door has been toned down with paint but will eventually be replaced with an antique screen door.
I was wondering if you were planning to restore the iron roof cresting. Most restored houses I’ve seen that had originally had iron on the roofs neglect restoring this detail. It’s very impressive that you are doing this. I assume there was nothing left of it when you bought the house, so Jim re-created the cresting from scratch?
There is not much that Jim cannot fix or duplicate, but iron work is not one of his skills. We ordered the cresting from Architectural Iron in Milford, Pennsylvania. We can’t wait to get on the roof to install it, but it will have to wait for much cooler weather. Jim ‘customized’ the former Huskers beer coozie… it’s his favorite!
Longtime reader, don’t often comment. I just wanted to say that you both do beautiful work, and I’d love to see the house in person so I could really appreciate its beauty.
Also: As a long-time Nebraskan, former Kansan, that custom koozie cracks me up.
Thank you, Barb! We would love for you to see the house; let us know if you are going to be in northwestern Kansas and we’ll make it happen! I’m a long-time Kansan, former Nebraskan… glad that you appreciate the humor!
I’m back-and-forth between Nebraska and Kansas at least once a month, as I travel to Emporia, Kansas to visit my Dad often. It would be fun to make side trip to the house on one of my swings through Kansas. Remind me: Have you told us what city the house is located in?
You are welcome any time, but I have to warn you that the house is in the remote town of Oberlin which is roughly five long hours northwest of Emporia. When you are feeling like a long and adventurous side trip, please do visit! Oberlin is 27 miles south of McCook, Nebraska. Hope to see you some day; the house progresses every week!
Absolutely! Houses such as this were never meant to be all white and powder blue; the house was literally starving for color for decades. We feel energized and are excited to bring back the past in such a tangible way. It’s a good feeling when people, whether commenting online or walking/driving by, stop to offer encouragement! It lets us know we’re making a difference and we do appreciate it; thanks!


I was wondering if you were planning to restore the iron roof cresting. Most restored houses I’ve seen that had originally had iron on the roofs neglect restoring this detail. It’s very impressive that you are doing this. I assume there was nothing left of it when you bought the house, so Jim re-created the cresting from scratch?
Also I laughed out loud at the beer holder!!!!
There is not much that Jim cannot fix or duplicate, but iron work is not one of his skills. We ordered the cresting from Architectural Iron in Milford, Pennsylvania. We can’t wait to get on the roof to install it, but it will have to wait for much cooler weather. Jim ‘customized’ the former Huskers beer coozie… it’s his favorite!
Longtime reader, don’t often comment. I just wanted to say that you both do beautiful work, and I’d love to see the house in person so I could really appreciate its beauty.
Also: As a long-time Nebraskan, former Kansan, that custom koozie cracks me up.
Thank you, Barb! We would love for you to see the house; let us know if you are going to be in northwestern Kansas and we’ll make it happen! I’m a long-time Kansan, former Nebraskan… glad that you appreciate the humor!
I’m back-and-forth between Nebraska and Kansas at least once a month, as I travel to Emporia, Kansas to visit my Dad often. It would be fun to make side trip to the house on one of my swings through Kansas. Remind me: Have you told us what city the house is located in?
You are welcome any time, but I have to warn you that the house is in the remote town of Oberlin which is roughly five long hours northwest of Emporia. When you are feeling like a long and adventurous side trip, please do visit! Oberlin is 27 miles south of McCook, Nebraska. Hope to see you some day; the house progresses every week!
My jaw physically dropped when I saw the painted dormers. Such a magnificent difference it makes.
Absolutely! Houses such as this were never meant to be all white and powder blue; the house was literally starving for color for decades. We feel energized and are excited to bring back the past in such a tangible way. It’s a good feeling when people, whether commenting online or walking/driving by, stop to offer encouragement! It lets us know we’re making a difference and we do appreciate it; thanks!